Choosing the right injera maker is crucial for beginners. It ensures consistent, delicious results. Understanding key features helps make an informed decision. Many home cooks now use modern appliances.
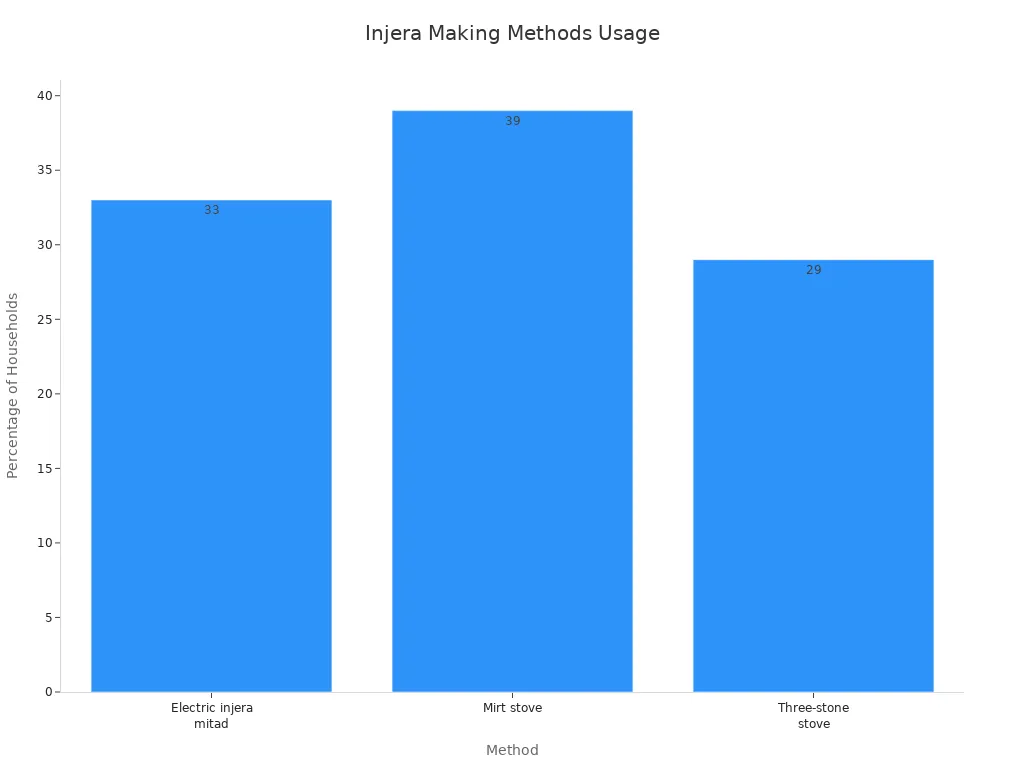
This chart shows how different methods are used. An electric injera maker offers convenience, similar to a Pizza Oven. A Homemade Pizza Oven with glass view window provides a visible cooking process.
Key Takeaways
- Electric injera makers are best for beginners. They are easy to use and cook injera evenly.
- Choose an injera maker with good temperature control. This helps cook injera perfectly every time.
- The cooking surface material matters. Cast iron lasts long, and non-stick is easy to clean.
- Always clean your injera maker after each use. This keeps it working well and safe.
- Make sure your injera batter is the right thickness. This helps prevent injera from sticking or tearing.
- Learn to pour batter in a spiral. This makes injera round and cooks it evenly.
- Store cooked injera properly. Cover it to keep it soft and fresh.
Understanding Injera Maker Options
Home cooks have several options for preparing injera. Each type offers distinct advantages and caters to different preferences. Understanding these choices helps beginners select the best tool for their kitchen.
Electric Injera Makers: Dough-to-Plate Convenience
Electric injera makers provide a modern, efficient way to prepare this staple flatbread. They are popular for their ease of use and consistent performance.
Ease of Use for Beginners
Electric models simplify the injera-making process. Users plug in the appliance, set the temperature, and pour the batter. This straightforward operation reduces the learning curve for new cooks. Beginners find these machines less intimidating than traditional methods.
Consistent Heat Distribution
Electric injera makers excel at maintaining uniform heat across the cooking surface. This consistency is vital for evenly cooked injera. Electric heating provides precise temperature control. This control is crucial for even cooking and consistent product quality. Many manufacturers use high-grade aluminum alloy (6061) for the baking tray. This material is chosen for its optimal thermal conductivity and durability. It directly contributes to excellent heat distribution across the baking surface. Researchers also investigate materials like steel powder additives to improve thermal conductivity. Different compositions, such as 15%, 25%, and 35% steel powder, are tested to achieve this objective.
Common Features and Benefits
Electric injera makers often include non-stick surfaces, adjustable thermostats, and indicator lights. Non-stick coatings prevent batter from adhering, making removal easy. Adjustable thermostats allow precise temperature settings for various batters. Indicator lights signal when the surface reaches the desired temperature. These features combine to offer a convenient and reliable cooking experience.
Traditional Clay and Metal Griddles: For the Purist
Traditional griddles offer an authentic injera-making experience. They appeal to those who value historical methods and specific flavor profiles.
Authenticity and Flavor Profile
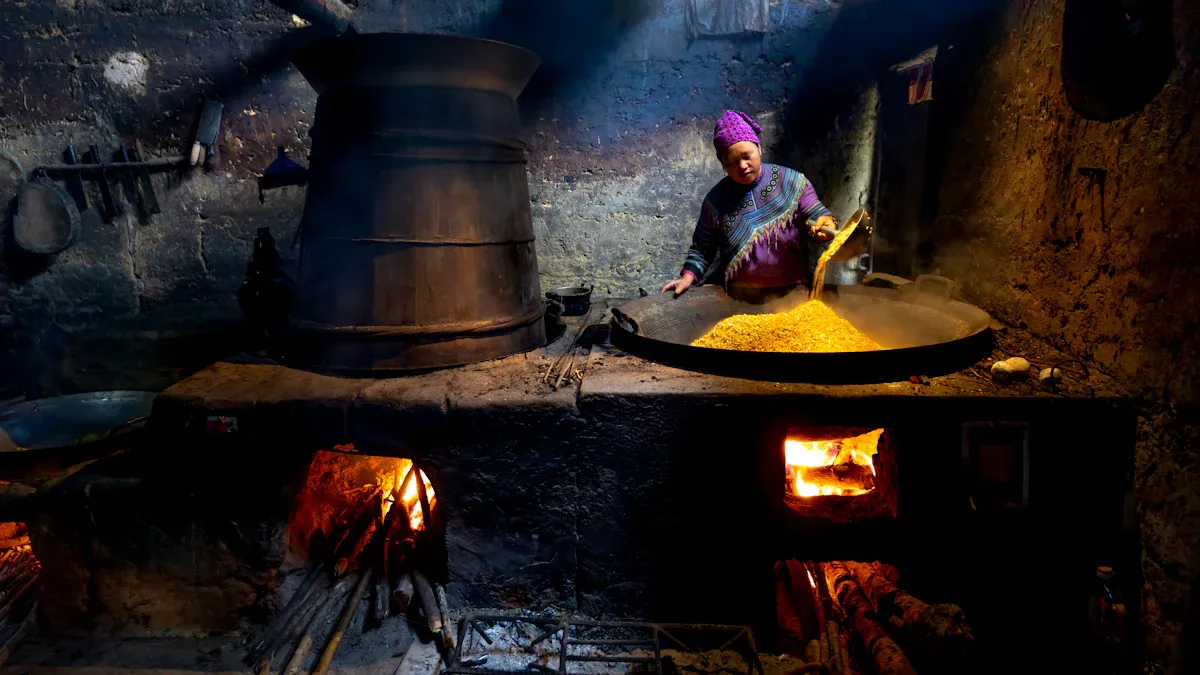
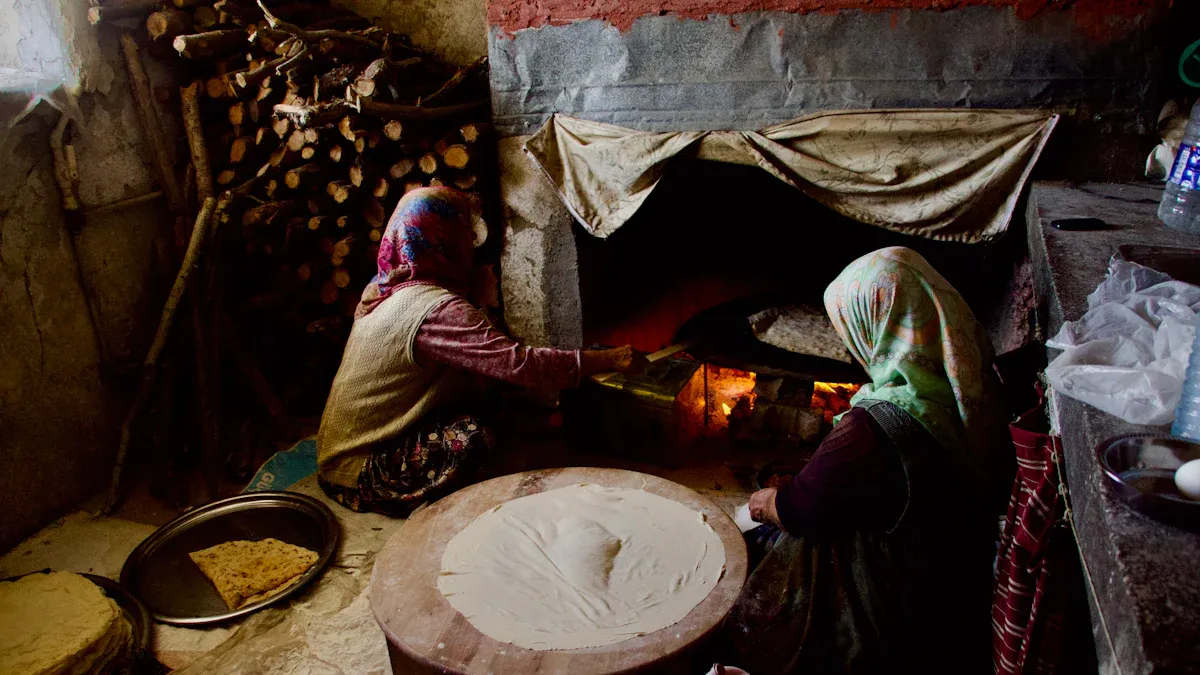
Traditional clay griddles, known as mitad (Amharic) or mogogo (Tigrinya), have a long history. Archaeologists discovered evidence of these griddles dating back to 600 AD in Ethiopia and Eritrea. In Sudan, ceramic doka griddles were common in domestic kitchens until the 1960s. These ceramic griddles required longer preheating but absorbed and stored heat effectively. This led to more stable baking temperatures. The technique of griddle cooking has a history spanning over two millennia in Sudan. Flat ceramic plates from early Iron Age domestic sites are believed to be predecessors of modern griddles. The material of the griddle significantly influences the sensory properties of the final food product. It affects the taste, smell, and texture of the bread. Ceramic griddles impart specific qualities to flatbreads. These qualities are partially lost when baking on metal plates. Griddles are essential for preparing flatbreads like injera (from tef) and kisra (from sorghum). These flatbreads are central to the cuisines of Ethiopia, Eritrea, and Sudan. Women bake flatbreads daily at the household level, passing down knowledge and techniques. This highlights the deep cultural integration of griddle cooking.
Learning Curve and Skill Required
Using traditional griddles demands a higher skill level. Cooks must manage heat sources like charcoal, wood, or gas. They learn to gauge temperature by feel and observation. Mastering the pouring technique and achieving the characteristic “eyes” of injera requires practice. This method offers a rewarding experience for those dedicated to traditional culinary arts.
Specific Heating Requirements
Traditional griddles need specific heating arrangements. Clay mitads often sit over charcoal or wood fires. Metal griddles can use gas burners or open flames. Maintaining a consistent, even heat across the large surface is challenging. Users must monitor the heat source and adjust it manually. This ensures proper cooking and prevents burning.
Hybrid Injera Maker Models: Best of Both Worlds?
Hybrid models attempt to combine the advantages of electric convenience with traditional cooking surfaces. They cater to a specific segment of the market.
Combining Electric Heating with Traditional Surfaces
Hybrid injera maker models typically feature an electric heating element beneath a traditional-style cooking surface. This design aims to provide the consistent heat of an electric appliance. It also seeks to retain some of the unique cooking properties of clay or cast iron. These models often use a heavy-gauge metal plate designed to mimic traditional griddles.
Niche Market Appeal for Specific Users
These hybrid models appeal to users who desire a balance between authenticity and convenience. They suit individuals who appreciate the cultural significance of traditional cooking methods. However, they also value the ease and reliability of modern appliances. This niche market often includes those with limited access to traditional cooking setups.
Potential Advantages and Disadvantages
Hybrid models offer consistent heat control, a significant advantage over open-flame traditional methods. They can also provide a more authentic texture or flavor profile than purely electric non-stick surfaces. However, they may come with a higher price tag. They might also be less widely available than standard electric models. Users should weigh the benefits of combined features against potential costs and availability.
Key Features to Look for in an Injera Maker
Selecting an injera maker involves evaluating several key features. These features directly impact the quality of the injera and the user’s overall cooking experience. Understanding these aspects helps beginners make an informed decision.
Plate Material: Cast Iron vs. Non-Stick
The cooking surface material significantly influences injera preparation. Each material offers distinct advantages and disadvantages.
Durability and Heat Retention of Cast Iron
Cast iron cooking surfaces provide exceptional durability and heat retention. They distribute heat evenly, which is crucial for perfectly cooked injera. Many professionals prefer cast iron for its robust performance.
- Superior heat retention and even cooking
- Develops a natural non-stick surface over time
- Extremely durable and long-lasting
- Enhances flavor through seasoning (similar to traditional cooking)
- Compatible with all stovetops, including induction
- Produces a richly flavored injera with a slightly crisp bottom layer
- Can create subtle caramelization on the edges of the injera, adding a slightly smoky, rustic depth to the flavor
- Suitable for both stovetop and oven use
Ease of Cleaning and Maintenance of Non-Stick
Non-stick surfaces offer unparalleled convenience for cleaning and maintenance. Batter releases easily, preventing sticking and making cleanup quick. Users typically wipe down these surfaces with a damp cloth after use. This ease of care appeals to busy individuals.
Health Considerations and Coatings
Health considerations often arise with non-stick coatings. Many modern non-stick surfaces are PFOA-free and PTFE-free, addressing past concerns. Manufacturers now use safer alternatives. Consumers should verify the specific coating type and its safety certifications before purchasing.
Size and Capacity of Your Injera Maker
The size of an injera maker directly relates to its capacity and suitability for different household needs.
Standard Diameters and Their Implications
Injera makers come in various sizes, impacting the number and size of flatbreads produced. The standard injera diameter is typically 40–50 cm. This range accommodates most traditional serving styles.
| Model | Diameter (cm) |
|---|---|
| DT-INJ500 | 40–45 |
| DT-INJ800 | 40–50 |
| DT-INJ1200 | 45–50 |
| DT-INJ1500 | 45–55 |
Larger diameters allow for bigger injera, suitable for communal meals. Smaller diameters produce individual portions.
Matching Size to Family Needs
Consider the size of your household and your typical consumption when choosing an injera maker. A larger family or frequent entertaining suggests a larger diameter model. Individuals or small families might find a smaller, more compact unit sufficient. This ensures efficient cooking without excess waste.
Kitchen Space and Storage Considerations
The physical dimensions of the injera maker also matter for kitchen space and storage. Larger models require more counter space during use and dedicated storage when not in operation. Assess available kitchen space before committing to a particular size.
Temperature Control: Precision for Perfection
Accurate temperature control is paramount for consistently perfect injera.
Importance of Adjustable Thermostats
Adjustable thermostats provide precise control over the cooking temperature. Different injera batters or desired textures may require specific heat settings. A thermostat allows users to fine-tune the heat, ensuring optimal cooking conditions. This precision prevents burning or undercooking.
Consistent Heat for Even Cooking
Consistent heat across the entire cooking surface ensures even cooking. Hot spots or cold spots lead to unevenly cooked injera, affecting both texture and appearance. A well-designed heating element and effective thermostat maintain uniform temperature distribution. This results in uniformly cooked flatbreads.
Indicator Lights and Their Role
Indicator lights offer visual cues regarding the injera maker’s status. A “power” light confirms the unit is on, while a “ready” light signals when the cooking surface reaches the set temperature. These lights guide users, preventing premature pouring of batter onto a cold surface or waiting too long for it to heat up. They simplify the cooking process for beginners.
Power and Heating Elements: Efficiency Matters
The power and heating elements of an injera maker significantly influence its performance. These components determine how quickly the appliance heats up and maintains temperature.
Wattage and Heating Speed
Wattage indicates the power of an injera maker’s heating element. Higher wattage generally means faster heating. An injera maker with a higher wattage rating reaches its optimal cooking temperature more quickly. This feature benefits busy cooks who need to prepare injera efficiently. A powerful heating element reduces preheating time, allowing users to start cooking sooner.
Recovery Time Between Batches
Recovery time refers to how quickly the cooking surface regains its set temperature after each injera cooks. An efficient heating element ensures the injera maker rapidly regains its heat. This minimizes waiting periods between pouring batter. Fast recovery time is crucial for producing multiple injera in a continuous session. It helps maintain consistent cooking quality throughout the entire batch.
Energy Consumption
The wattage of an injera maker also relates to its energy consumption. While higher wattage provides faster heating, it can also use more electricity. Modern injera makers often balance power with energy efficiency. They aim to heat quickly without excessive energy waste. Users can look for models designed for efficient operation to manage electricity usage.
Safety Features for Your Injera Maker
Safety is a critical consideration when selecting any kitchen appliance. Injera makers, which operate at high temperatures, benefit from specific safety features.
Cool-Touch Handles and Bases
Cool-touch handles and bases prevent accidental burns. These design elements ensure that certain parts of the injera maker remain cool to the touch during operation. Users can safely move or adjust the appliance without risk of injury. This feature provides peace of mind, especially in busy kitchens.
Automatic Shut-Off Mechanisms
Automatic shut-off mechanisms enhance safety by preventing overheating or prolonged operation. Some injera makers automatically turn off after a set period of inactivity. Others may shut down if they detect an unsafe temperature. This feature protects the appliance from damage and reduces fire hazards. It also conserves energy if users forget to turn off the unit.
Stable Design to Prevent Tipping
A stable design is essential for preventing accidents. Injera makers should have a wide, sturdy base. Non-slip feet further enhance stability on countertops. This design prevents the appliance from tipping over during use. A stable unit reduces the risk of hot batter spills or burns.
Ease of Cleaning Your Injera Maker
Maintaining kitchen hygiene is important. An injera maker that is easy to clean simplifies post-cooking tasks.
Non-Stick Surfaces for Quick Wipes
Non-stick cooking surfaces are a significant advantage for easy cleaning. Batter releases effortlessly from these surfaces. This prevents food from sticking and burning onto the plate. After cooking, users can typically wipe down the non-stick surface with a damp cloth. This quick cleaning process saves time and effort.
Removable Parts for Thorough Cleaning
Some injera makers feature removable parts, such as drip trays or cooking plates. These components can be detached for more thorough cleaning. Removable parts allow users to access all surfaces, ensuring complete removal of batter residue. This design promotes better hygiene and extends the life of the appliance.
Dishwasher-Safe Components (If Applicable)
The ultimate convenience in cleaning comes from dishwasher-safe components. While the main cooking surface of an injera maker is rarely dishwasher-safe, some smaller parts might be. Users should check product specifications for this feature. Modern injera makers are designed with ease of cleaning in mind, primarily through the use of stainless steel in their construction. This material is specifically chosen because it is inherently easy to clean, which helps maintain a hygienic production environment for food preparation.
Budgeting for Your Injera Maker: What to Expect
The cost of an injera maker varies significantly. Price depends on features, materials, and brand reputation. Understanding these categories helps buyers find a suitable option within their budget.
Entry-Level Injera Maker Options: Affordable and Functional
Entry-level injera makers provide a cost-effective starting point for beginners. These models focus on essential functionality.
Basic Models for First-Time Buyers
Basic models are ideal for individuals new to making injera. They offer straightforward operation without complex features. These appliances allow users to practice their technique without a large initial investment. They serve as a practical introduction to home injera production.
Essential Features at a Lower Price Point
Affordable injera makers typically include a non-stick cooking surface and a basic temperature control dial. They heat up sufficiently to cook injera effectively. While they may lack advanced settings, they perform the core task reliably. These models prioritize functionality over elaborate design.
Where to Find Budget-Friendly Makers
Consumers can find budget-friendly injera makers at major online retailers, discount stores, and specialized ethnic appliance shops. Comparing prices and reading user reviews helps identify reliable options in this category.
Mid-Range Injera Maker Choices: Balancing Features and Price
Mid-range injera makers offer a good balance between enhanced features and reasonable pricing. They provide improved performance and durability.
Enhanced Features Without Breaking the Bank
These models often include more sophisticated features than entry-level options. They typically feature adjustable temperature controls, allowing for precise heat management. Many also offer larger cooking zones, accommodating bigger injera. Improved nonstick coatings are common, enhancing both cooking and cleaning experiences. These enhancements contribute to more consistent and satisfying results.
Improved Durability and Performance
Mid-range injera makers often use better quality materials in their construction. This leads to increased durability and a longer lifespan. Their heating elements provide more consistent heat distribution, which improves cooking performance. Users can expect a more reliable and efficient cooking experience.
Popular Brands in the Mid-Range
Several manufacturers offer reputable mid-range injera maker models. These brands often have a track record of producing reliable kitchen appliances. They balance innovation with affordability, appealing to a broad customer base.
Premium Injera Maker Models: Investment for Longevity
Premium injera makers represent a significant investment. They offer advanced technology and superior build quality.
Advanced Features and Technology
High-end models incorporate cutting-edge features. These may include digital temperature displays, programmable settings, and smart connectivity. Some premium injera makers also offer specialized cooking surfaces designed for optimal texture and flavor. These advanced technologies aim to provide the ultimate injera-making experience.
Superior Build Quality and Materials
Premium models utilize high-grade materials such as heavy-duty cast iron or specialized alloys. Their construction emphasizes durability and precision engineering. These materials ensure even heat distribution and exceptional longevity. The craftsmanship reflects a commitment to quality.
Long-Term Value and Durability
While more expensive upfront, premium injera makers offer long-term value. Their robust construction and advanced features ensure years of reliable performance. They resist wear and tear better than cheaper alternatives. This makes them a worthwhile investment for serious injera enthusiasts.
Setting Up Your New Injera Maker: First Steps for Beginners
Acquiring a new injera maker marks an exciting step toward mastering this traditional flatbread. Proper setup ensures optimal performance and longevity. Beginners should follow these initial steps carefully.
Unboxing and Initial Cleaning
The first interaction with a new appliance involves careful preparation. This process safeguards the device and ensures it is ready for use.
Removing Packaging and Protective Materials
Users should carefully remove all packaging materials, including plastic wraps, foam inserts, and cardboard. Manufacturers often include protective films or stickers on cooking surfaces or control panels. Remove these items before proceeding.
First Wash and Wipe Down
Before its first use, clean the injera maker. Wipe down the exterior with a damp cloth. For the cooking surface, use a soft sponge with mild soap and warm water. Rinse thoroughly and dry completely. This removes any manufacturing residues or dust.
Checking for Damage
Inspect the injera maker for any signs of damage during shipping. Check the cooking surface for scratches or dents. Examine the power cord for fraying or cuts. Contact the retailer or manufacturer immediately if any damage is present.
Seasoning Your Injera Maker (If Applicable)
Seasoning is a crucial step for certain injera maker types, particularly those with cast iron surfaces. This process creates a natural non-stick layer.
Instructions for Cast Iron Surfaces
Cast iron injera makers require seasoning to develop their non-stick properties. High smoke point oils work best for this process. Grapeseed oil, refined avocado oil, almond oil, or sunflower oil are reliable choices. Canola oil also performs well. After cooking, while the cast iron is still warm, rinse it with hot water. Use a brush or non-metal scraper to remove stuck-on bits. For tough film, scrub with salt and oil. Add a few tablespoons of neutral-tasting cooking oil and salt, then scrub with a rag. Rinse thoroughly and dry with a towel.
To season, place the clean pan on the stovetop over low heat or in the oven at about 200-225℉ until warm. Add a very small amount of oil (1/2-1 teaspoon) and wipe it across the entire surface. Wipe thoroughly with a dry rag. Let it cool completely before storing. Under a microscope, cast iron pans have tiny pores and irregularities where food can stick. Seasoning fills these pores. When fat heats in the presence of metal and oxygen, it polymerizes. This forms a solid, plastic-like substance that coats the pan. Repeated heating of oil thickens this coating, improving its nonstick properties.
Maintaining Non-Stick Coatings
Injera makers with factory-applied non-stick coatings do not require seasoning. Users should follow the manufacturer’s instructions for care. Avoid abrasive cleaners or metal utensils that can damage the coating.
Importance of Proper Seasoning
Proper seasoning prevents injera from sticking. It also protects the cast iron from rust. A well-seasoned surface contributes to better flavor and easier cleanup. Seasoning develops over time with regular use. Cooking with cast iron often builds thin, durable layers. These layers form a resilient, ultra-slick surface.
Understanding Injera Maker Controls: A Quick Guide
Familiarizing oneself with the controls ensures efficient and safe operation.
Temperature Settings and Dials
Most injera makers feature a temperature dial or digital controls. These allow users to select the desired cooking temperature. Start with the manufacturer’s recommended setting for injera. Adjust as needed based on batter consistency and desired results.
Power and Ready Indicator Lights
Indicator lights provide essential feedback. A “power” light confirms the unit is on. A “ready” light illuminates when the cooking surface reaches the set temperature. Wait for the “ready” light before pouring batter. This ensures consistent cooking.
First Test Run Procedures
Perform a test run without batter. Plug in the injera maker and set it to a medium temperature. Observe the indicator lights. This confirms the appliance heats up correctly. It also helps users understand the controls before actual cooking.
Mastering Your Injera Maker: Tips for Perfect Results
Achieving perfect injera consistently requires attention to detail at every stage. Beginners can master this art by focusing on key techniques.
Preparing Your Batter: Consistency is Key
The foundation of excellent injera lies in its batter. Proper preparation ensures the desired texture and flavor.
Ideal Batter Thickness
Batter consistency directly impacts injera quality. A batter that is too thick results in dense, heavy injera. Conversely, overly thin batter produces brittle injera that tears easily. The ideal consistency resembles thin pancake batter or heavy cream. It should pour smoothly but coat a spoon lightly.
Fermentation Process and Timing
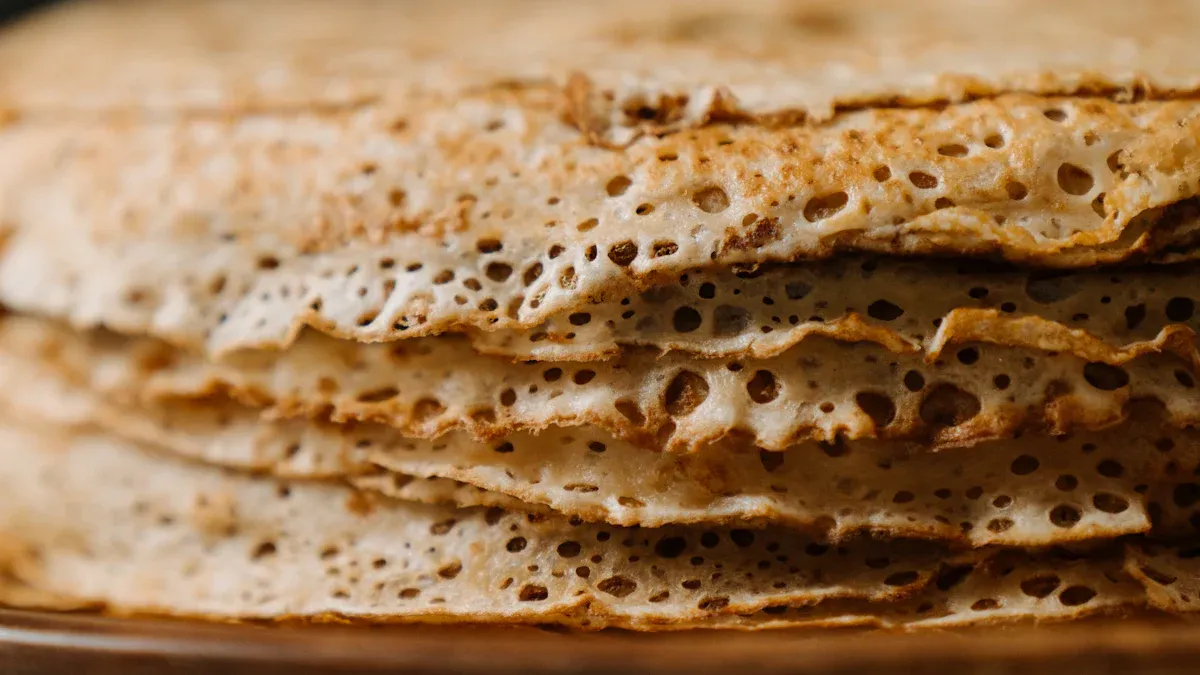
Fermentation gives injera its characteristic sour taste and spongy texture. This process typically takes 2-3 days at room temperature. During fermentation, wild yeasts in the teff flour produce carbon dioxide, creating the signature “eyes” or pores. Over-fermentation can lead to an excessively sour taste and a weak structure. Under-fermentation results in flat, dense injera.
Common Batter Mistakes to Avoid
Beginners often make mistakes with batter. Adding too much water at once can make the batter too thin. Not allowing enough fermentation time prevents proper bubble formation. Using cold water can slow down fermentation. Always use lukewarm water to activate the yeast effectively.
Pouring Technique for Your Injera Maker
Pouring the batter correctly ensures even cooking and a uniform shape. This step requires practice and precision.
Swirling the Batter for Uniformity
Pour batter onto the hot surface in a spiral motion, starting from the outer edge and moving inward. This technique ensures even coverage. A quick, continuous swirl prevents thick spots and promotes uniform bubble distribution.
Amount of Batter per Injera
The amount of batter used depends on the injera maker’s size. Too much batter creates a thick injera. Too little batter results in a thin, fragile one. For a standard 16-inch injera maker, approximately 500ml-600ml of batter works well. Adjust this amount based on your specific appliance.
Speed and Precision
Pouring speed is crucial. A slow pour can cause the batter to cook unevenly. A fast, confident pour ensures the batter spreads quickly and uniformly before it sets. Precision in pouring helps create a perfectly round injera.
Cooking Time and Temperature: The Sweet Spot
Finding the right cooking temperature and duration is essential for soft, pliable injera.
Observing the Bubbles and Edges
Successful injera cooking involves careful observation. Bubbles, or “eyes,” form on the surface as the injera cooks. These indicate proper fermentation and heat. The edges of the injera will begin to lift when it is ready.
Adjusting for Different Batters
Different teff flours or fermentation times may require temperature adjustments.
- Heat a non-stick cooking surface to medium-high.
- A 16″ Wass Mitad/Mogago performs well at 250°F, though some cooks prefer 350°F; test to find your ideal temperature.
- Use less batter for the first injera (around 500ml-600ml for a 16” injera) to check bubble formation.
- Cover with a lid once about 80% of the ‘eyes’ (bubbles) have formed.
- Remove the lid approximately 30 seconds after steam appears around the edges, when the injera edges begin lifting.
For smaller batches:
- Preheat a 9″ non-stick or cast-iron skillet on medium-high heat for 5 minutes.
- Lightly spray the skillet with cooking spray.
- Pour ¼ cup of batter in a spiral from the outside to the center of the hot pan, tilting to fill any gaps.
- Immediately cover the pan with a loose-fitting lid and cook for 2-3 minutes.
- Injera is done when the top is no longer shiny or wet and feels firm.
- Transfer cooked injera to a plate and cover immediately with a kitchen towel or plastic wrap to keep it moist and soft.
Preventing Over or Under-Cooking
Overcooked injera becomes dry and brittle. Undercooked injera remains doughy and sticky. Adjust cooking time based on the injera’s appearance. The surface should look dry, and the edges should lift easily.
Troubleshooting Common Beginner Injera Maker Issues
Beginners often encounter specific challenges when making injera. Understanding common problems and their solutions helps achieve consistent, high-quality results. This section addresses frequent issues and provides practical advice.
Injera Sticking to the Plate
Injera sticking to the cooking surface is a frustrating but common problem. Several factors contribute to this issue.
Solutions for Adhesion Problems
Several factors can cause injera to stick.
- Insufficient Cooking: Not cooking the injera long enough makes it gummy and prone to sticking. Ensure the entire injera darkens, and its edges slightly turn upwards or become a little crisp before removal.
- Watery Batter: An overly watery batter causes sticking and tearing. Adding a little more wheat flour helps achieve the correct consistency.
- Pan Coating: The type of pan coating is crucial. A nonstick pan, such as a Teflon pan, is recommended. Avoid oiling the pan; instead, salt it first.
- Flour Type: Using 100% teff or wholewheat flour can affect the injera’s stretchiness and its ability to come off the pan cleanly. Adding white flour to 100% teff or avoiding wholewheat flour can improve texture.
- Removal Technique: The method of removing the injera, including the tools used and the size of the injera, significantly impacts whether it sticks or tears. Using wide, flat tools and starting with smaller injera can help improve technique.
Re-Seasoning or Cleaning Tips
Proper maintenance prevents sticking. For cast iron surfaces, regular seasoning builds a natural non-stick layer. Clean non-stick surfaces gently with a soft cloth and mild soap. Avoid abrasive scrubbers or metal utensils that can damage the coating.
Adjusting Batter Consistency
A batter that is too thin often sticks and tears. A slightly thicker batter provides more structure. Adjust the batter by adding small amounts of flour or water until it pours smoothly but coats a spoon lightly.
Uneven Cooking and Browning
Unevenly cooked injera lacks the desired uniform texture and appearance. This issue often stems from heat distribution or batter application.
Tips for Achieving Consistent Texture
Consistent texture requires even heat and uniform batter spread. Ensure the injera maker preheats fully before pouring batter. This allows the entire surface to reach the target temperature.
Checking for Hot Spots
Some injera makers develop hot spots. Users can test for these by sprinkling a little water on the surface. Water should evaporate evenly across the plate. Adjust the batter pour to compensate for any noticeable hot spots.
Ensuring Even Batter Spread
Pour batter in a continuous spiral motion, starting from the outside and moving inward. This technique ensures even coverage. A quick, confident pour helps the batter spread uniformly before it sets.
Temperature Fluctuations
Inconsistent temperature leads to uneven cooking. Use an injera maker with a reliable thermostat. Allow the appliance to recover its temperature between batches. This maintains a steady cooking environment.
Injera Too Crispy or Too Soft
The final texture of injera is a matter of preference, but consistency is key. Adjustments in cooking and batter can resolve texture issues.
Adjusting Cooking Time and Heat
Overcooking injera at high heat makes it crispy and brittle. Reducing the cooking time or lowering the temperature can result in a softer injera. Conversely, undercooking leaves injera too soft or doughy. Increase cooking time slightly for a firmer texture.
Batter Hydration Issues
Batter hydration significantly impacts the final texture. If the injera batter is too thin, indicating higher hydration, the edges of the finished injera will be crispy. Conversely, if the batter is too thick, indicating lower hydration, the injera will turn out doughy and sticky. Adjust water content gradually to find the ideal consistency.
Storage and Cooling Techniques
Proper storage helps maintain injera’s softness. Stack cooked injera while still warm and cover them immediately with a clean kitchen towel or plastic wrap. This traps steam, keeping the injera moist and pliable. Allow injera to cool completely before refrigerating.
Maintaining Your Injera Maker for Longevity
Proper maintenance significantly extends an injera maker‘s lifespan. Regular care ensures consistent performance and hygienic operation. Users protect their investment through diligent cleaning and storage.
Regular Cleaning Practices
Consistent cleaning prevents residue buildup and maintains cooking efficiency. Adhering to a cleaning schedule keeps the appliance in optimal condition.
Post-Use Cleaning Routines
After each use, users must thoroughly clean the cooking surface. This prevents bacterial growth and residue buildup, especially from moist, fermented batter. Allow the machine to cool slightly. Then, wipe non-stick plates with a damp cloth or soft sponge. Avoid abrasive scrubbers or metal utensils. These items can damage the delicate surface.
Deep Cleaning Schedules
For stubborn residue, users can employ a non-abrasive cleaner or a paste of baking soda and water. Never immerse the entire unit in water. Only clean removable plates if the manufacturer specifies dishwasher safety. This prevents damage to electrical components.
Recommended Cleaning Agents
Mild dish soap and warm water are generally sufficient for routine cleaning. For more persistent stains, a baking soda paste offers an effective, non-abrasive solution. Always rinse surfaces thoroughly to remove all cleaning agent traces.
Proper Storage Techniques
Correct storage protects the injera maker from damage and environmental factors. It preserves the appliance’s functionality.
Protecting the Cooking Surface
Always protect the cooking surface during storage. Place a soft cloth or paper towel between the plates if stacking. This prevents scratches and preserves the non-stick coating.
Storing in a Dry Environment
Store the machine in a dry, dust-free area. Cover it with a breathable cloth to prevent moisture buildup. Moisture can damage electrical components or cause corrosion. A dry environment is crucial for longevity.
Preventing Scratches and Damage
Handle the injera maker carefully when moving or storing it. Avoid placing heavy objects on top of the unit. This prevents structural damage and maintains its aesthetic appeal.
When to Consider Replacement or Repair
Even with diligent care, appliances eventually show signs of wear. Knowing when to repair or replace saves time and ensures safety.
Signs of Wear and Tear
Visible signs of wear include deep scratches on the cooking surface or frayed power cords. Cracks in the housing or loose components also indicate potential issues. These signs often suggest a need for attention.
Performance Degradation
Noticeable performance changes, such as uneven heating or longer cooking times, signal degradation. If the injera consistently sticks despite proper cleaning, the non-stick coating may have worn out. Reduced efficiency impacts cooking results.
Warranty Information and Service Options
Always consult the manufacturer’s warranty information before attempting repairs. Some issues may fall under warranty coverage. Contact authorized service centers for professional repairs. This ensures proper handling and maintains safety standards.
Selecting an injera maker requires careful consideration. Prioritize models with durability, adjustable temperature controls, and ease of cleaning. Always validate warranty coverage and request third-party quality test reports for assurance. Mastering injera involves achieving perfect batter consistency, like thin crepe batter, and mastering the griddle cooking process for rapid steam expansion. This creates the distinctive “eyes.” Troubleshooting common issues, such as no ‘eyes’ or sticking, ensures consistent results. Happy cooking!
FAQ
Which injera maker is best for a beginner?
Electric injera makers offer ease of use and consistent results. They simplify the process for new cooks. These models often feature non-stick surfaces and adjustable thermostats.
How should one clean an injera maker?
Wipe non-stick surfaces with a damp cloth after each use. For cast iron, follow seasoning instructions. Avoid abrasive cleaners. Ensure the appliance is cool before cleaning.
Why does injera sometimes stick to the cooking plate?
Sticking often occurs due to insufficient cooking or overly watery batter. Ensure the injera cooks completely. Adjust batter consistency if needed. Proper seasoning also prevents adhesion.
What is the ideal fermentation time for injera batter?
Fermentation typically takes 2-3 days at room temperature. This process develops the characteristic sour taste and spongy texture. Proper timing ensures optimal bubble formation.
Can users make injera with flours other than teff?
Traditional injera uses teff flour. However, some recipes incorporate other flours like wheat or barley. These alternatives may alter the texture and flavor profile.
What is the recommended cooking temperature for injera?
Most electric injera makers perform well between 250°F and 350°F. Users should consult their specific model’s manual. Adjust the temperature based on batter consistency and desired results.
How should one store cooked injera to maintain freshness?
Stack cooked injera while still warm. Cover them immediately with a clean kitchen towel or plastic wrap. This traps steam, keeping the injera moist and pliable. Refrigerate after cooling.
Post time: Nov-10-2025